
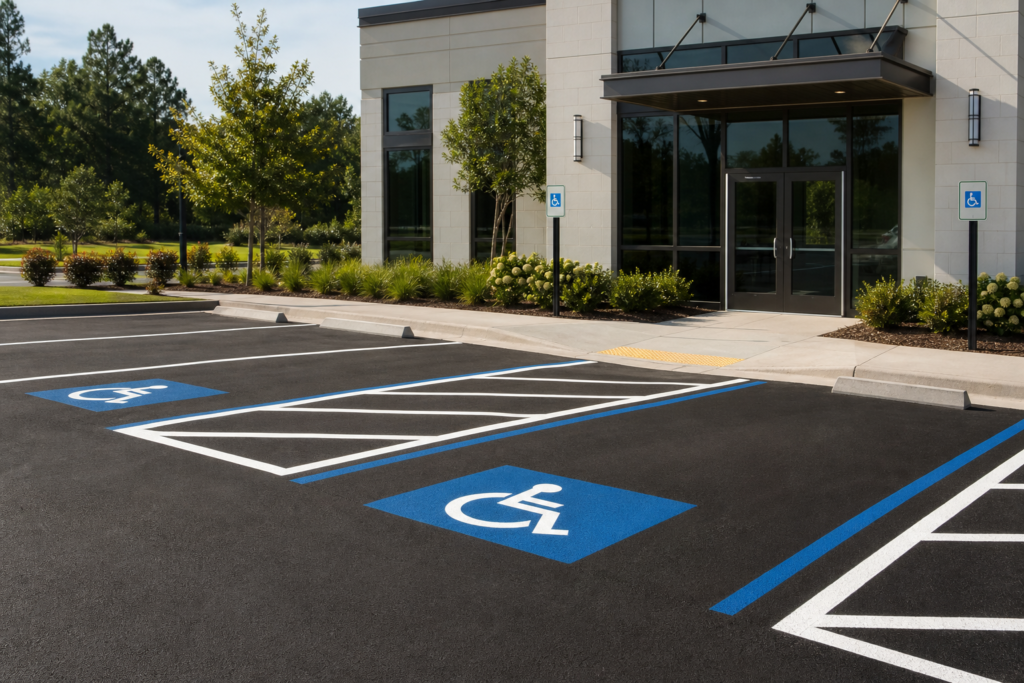
ADA-compliant parking lot striping requires more than painting a blue symbol on pavement. A workable plan must coordinate accessible space dimensions, access aisles, signs, the route to the destination, pavement condition, grades, drainage, and the timing of related site work.
Before restriping or installing accessible parking, identify why the lot is changing, confirm the applicable requirements for the facility, and document the layout before lines are painted. The steps below provide a practical ADA parking striping guide for Georgia developers, property managers, contractors, public agencies, and engineering teams. Project-specific requirements should still be confirmed with the responsible authority or design professional.
1. Review Why the Parking Area Is Being Changed
Start by recording the project trigger. New construction, a parking-area alteration, resurfacing, restriping, repainting, or routine maintenance may involve different reviews and scopes. Do not assume that an existing layout remains acceptable simply because the lot already has accessible spaces.
Georgia rules specifically address the resurfacing, restriping, or repainting of parking facilities in relation to accessibility requirements. Review the applicable state and local requirements before work begins, particularly when the property is a public facility or the project changes the number, location, circulation, or route serving parking spaces. The Georgia Accessibility Code addresses parking and passenger loading zones under Sections 208 and 209. Georgia accessibility rules and the Georgia Accessibility Code overview can help identify the relevant framework.
Stop and verify: Do not authorize final striping until the owner, design professional, or responsible authority confirms which requirements apply to the project.
2. Determine the Accessible Parking Scope Before Drawing Lines

The number of accessible spaces is not a universal percentage that can be applied without context. Determine the total parking count, facility type, whether parking is located in separate areas, existing accessible spaces, and whether the project is new construction or an alteration. Then confirm the applicable scoping requirements.
Gather the current site plan, parking inventory, property use, building entrances, loading areas, and any prior accessibility review. Note whether employees, visitors, residents, customers, or the public use the lot. Include accessible spaces that will be removed, relocated, or affected by construction.
Accessible spaces should be located on the shortest accessible route to an accessible entrance when that route is available. If the lot serves multiple entrances or destinations, the plan should show how each space connects to the destination it serves.
Stop and verify: Obtain the required space count and placement direction before preparing a final takeoff.
3. Lay Out Car Spaces, Van Spaces, and Access Aisles
Use official dimensions as the starting point, then check how the spaces fit the actual parking pattern, curbs, islands, slopes, and travel lanes. Federal ADA parking guidance identifies a minimum 96-inch width for an accessible car space and a minimum 60-inch access aisle. A van-accessible configuration may use a 132-inch-wide space with a 60-inch aisle or a 96-inch-wide space with a 96-inch aisle. ADA.gov parking guidance provides these dimensions and related requirements.
| Layout element | Minimum or required condition | Planning check |
|---|---|---|
| Accessible car space | 96 inches wide minimum | Confirm marked width and account for curbs, wheel stops, and obstructions. |
| Van-accessible option 1 | 132-inch space with a 60-inch aisle | Confirm the aisle is marked and does not become a travel lane. |
| Van-accessible option 2 | 96-inch space with a 96-inch aisle | Check the wider aisle after curbs, islands, signs, and adjacent stalls are installed. |
| Access aisle | At least 60 inches wide and the same length as the space | Keep it level, mark its boundary, and prevent overlap with a vehicular way. |
Access aisles must be marked, remain level with the adjacent parking space, and connect to an accessible route. They cannot simply be leftover pavement beside a stall. Account for turning movements, circulation, loading activity, curb ramps, and the relationship between accessible and standard spaces.
Before finalizing an ADA layout, compare the site’s parking lot striping patterns to understand how stall geometry, circulation, and accessible spaces work together.
Stop and verify: Measure the proposed space and aisle and confirm that the aisle does not narrow at a curb, sign, wheel stop, or pavement transition.
4. Verify the Route From Each Space to the Destination
Trace the entire path from each accessible parking space and access aisle to the building entrance or other required destination. The route may cross a drive aisle, connect to a curb ramp, pass through a crosswalk, or meet a sidewalk.
Look for wheel stops, sign posts, drainage grates, utility covers, parked vehicles, landscape edges, curb faces, and temporary barriers that could interfere with the route. If a route crosses a roadway, coordinate the crossing, traffic flow, markings, and signs as part of the same plan.
Painted lines cannot correct an inaccessible curb ramp, blocked sidewalk, or unsuitable slope. If the route depends on construction that has not yet occurred, identify that dependency and establish who verifies it before the lot opens.
Stop and verify: Walk the proposed route from the space to the destination before approving the layout.
5. Coordinate Accessible Markings, Signs, and Traffic Flow
Define the complete marking and sign package, not just the accessible stall outline. Depending on the project, the scope may include access-aisle markings, accessible parking signs, crosswalks, directional markings, parking stalls, wheel stops, traffic signs, and drive-aisle connections.
Include accessible markings and signs in the bid scope so striping, signage, paving, and final field coordination are handled together.
DCBC LLC lists parking stalls, crosswalks, handicapped striping and signing, highway signs, and wheel stop installation among its paint striping and sign services. These items can be quoted as part of a broader civil site work package when the parking area also requires paving, grading, drainage, or erosion-control coordination.
Stop and verify: Review the sign schedule, marking plan, crosswalk connections, and traffic-control assumptions together.
6. Check Pavement, Grades, and Drainage Before Striping
Inspect the surface before requesting a striping-only quote. Cracking, potholes, failed patches, ponding, uneven pavement, damaged curbs, or deteriorated transitions can affect accessible markings. Striping over a surface that will soon be milled, resurfaced, or repaired can create rework.
Review grades and drainage around accessible spaces, access aisles, curb ramps, sidewalks, and crosswalks. Check whether catch basins, drop inlets, manholes, slope drains, or other structures interfere with the proposed layout.
DCBC LLC provides asphalt paving and resurfacing, milling, earthwork and grading, stormwater systems, erosion control, paint striping, signage, and related parking-area services.
Stop and verify: Confirm the sequence for grading, drainage, paving, curb work, and markings before mobilization.
7. Prepare a Contractor Quote That Can Be Compared
A useful quote request gives every contractor the same project information. Include:
- Property address, facility type, total parking count, and existing accessible spaces.
- Site plans, surveys, photographs, revisions, and accessibility or authority comments.
- Proposed accessible space and aisle locations, route connections, curb ramps, sidewalks, and crosswalks.
- Existing pavement condition, planned resurfacing or milling, curb work, drainage concerns, and grade issues.
- Required parking signs, aisle markings, stall markings, crosswalks, directional markings, wheel stops, and traffic-control needs.
- Surface preparation, repairs, marking materials, access restrictions, operating hours, and protection requirements.
- Assumptions, exclusions, alternates, cleanup, photographs, and closeout documentation.
Ask each bidder to identify whether the proposal covers striping only or includes paving, grading, stormwater, erosion control, signage, and field verification. A low price may not be comparable if one quote excludes repairs, signs, route work, or final documentation.
Stop and verify: Resolve unclear quantities and exclusions in writing before approving the quote.
8. Verify the Installation Before the Lot Reopens
Complete a field review after installation and before normal parking resumes. Confirm space widths, access-aisle widths and lengths, aisle boundaries, level conditions, signs, crosswalks, route connections, wheel stops, and nearby obstructions.
Inspect the interfaces with paving, curbs, drainage structures, sidewalks, and drive aisles. Photograph completed spaces and retain the final plan, measurements, sign information, material details, repair notes, and authority comments.
Field verification supports project closeout, but it does not replace an inspection, design review, or approval required by the responsible authority.
Stop and verify: Do not represent the installation as approved solely because the paint has dried.
Frequently Asked Questions
Does restriping a parking lot require reviewing accessible parking requirements in Georgia?
It can. Georgia rules address resurfacing, restriping, and repainting of parking facilities in relation to accessibility, but exact obligations depend on the facility, project scope, and applicable requirements.
What dimensions should an ADA car parking space and access aisle have?
Federal ADA guidance identifies a minimum 96-inch width for an accessible car space and a minimum 60-inch width for its access aisle. The aisle must be marked, be at least as long as the space it serves, remain level with the space, and connect to an accessible route. See the official parking-space guidance.
What is the difference between a van-accessible configuration and a standard accessible space?
A van-accessible configuration may use a 132-inch-wide space with a 60-inch aisle or a 96-inch-wide space with a 96-inch aisle. It still needs appropriate markings, a connected accessible route, suitable site conditions, and compliant signs.
Can accessible parking striping be completed before paving or drainage work?
It may be physically possible, but it can be poor sequencing if paving, milling, grading, curb work, or drainage construction will disturb the final layout. Coordinate final striping with completed surface and route conditions.
What information should I include when requesting an ADA parking striping quote?
Provide the property location, parking count, plans, existing accessible spaces, proposed locations, route and curb-ramp information, pavement condition, drainage concerns, signs, crosswalks, wheel stops, access restrictions, and desired closeout records.
Conclusion: Treat Accessible Striping as Part of the Site Plan
A strong ADA parking striping plan begins with the project trigger and applicable scoping requirements. It then connects accessible spaces and access aisles to a continuous route, coordinates signs and markings with traffic flow, checks pavement and drainage conditions, and defines who will verify the finished work.
The most useful quote is not necessarily the one with the fewest line items. It is the one that clearly states the accessible layout, route assumptions, paving and civil interfaces, marking and sign scope, exclusions, and closeout documentation.
DCBC LLC provides parking stalls, crosswalks, handicapped striping and signing, wheel stop installation, asphalt paving and resurfacing, stormwater systems, erosion control, and related civil site work.